 To return to the Rhododendron Basics Pages click here.
Rhododendron & Azalea Propagation
This article was originally published on Henning's Rhododendron &Azalea Website.
Plant propagation has two general types: sexual, and asexual or vegetative. Sexual propagation results in seed. It involves two parents and the seedling is a genetic blend of the two parents. Sexual propagation is usually done when the favorable characteristics of two parents are wanted on one plant. This is the field of hybridizing. It sometimes results in markedly improved plants, but a great deal of trial and error is involved. Once a successful hybrid has been created, it must be propagated by asexual methods to make genetically identical plants. Asexual or vegetative propagation is when vegetative tissue is nurtured into a new plant that is genetically identical to the original. Of course, a graft has different roots and top, but the top is genetically identical to the scion. However, the rootstock may cause variation from the original plant, such as dwarfing, disease resistant and tolerance of near alkaline conditions.
Seed: Gather seed capsules in the fall when they turn brown. Allow them to dry, remove and clean the seeds, and keep them in an envelope. In February, sow the seeds in a small pot containing 50% milled sphagnum moss and 50% horticultural perlite. Do not cover the seeds with the medium; just sprinkle the seeds on top. The germinating mixture should be sterilized with boiling water and allowed to cool before sowing. The pot needs to be in a controlled humid environment. Polyethylene bags are great for maintaining a high humidity. The pot is placed in a polyethylene bag with stakes to keep bag away from the germinating seed and placed in a light area with no direct sunlight. The pot is rotated once or twice a week to compensate for variations in light and temperature. Generally, no winter chilling is necessary to get the seeds to break dormancy. Keep the seed pots or flats in the 65°F to 75°F range. The seed will sprout in from 3 to 8 weeks (sometimes longer), and after they have formed their first set of true leaves they can be transplanted into other flats or containers. Since they are so tiny, they will not stand frost until they are larger and some months older. The seedlings will need to stay in the flats for probably 2 years. It's important to remove the plastic bag gradually.
David Fisher of Wiscasset, Maine, recommends "sowing the seed on top of live moss - this works for all ericaceous plants. I've generally used haircap moss, but any species should be fine." A number of nurserymen do this also.
Cuttings: Propagation of hybrid plants and selected cultivars of species requires a form of cloning. These include cuttings, tissue culture, grafting, and layering. Most rhododendron and evergreen azalea cuttings root fairly easily. Deciduous azaleas require special techniques to root.
1) Most rhododendrons and evergreen azaleas may be propagated from stem cuttings. Cuttings are usually taken in the early fall from new growth that is just beginning to harden off. Generally, softer wood roots more readily than harder wood, though the softer the wood, the more likely it is that problems will occur with fungus diseases. Cuttings are taken in the morning when full of moisture. The cuttings are usually terminal cuttings with one whirl of leaves and the leaves cut in half (to reduce the leaf area), and any flower buds removed. Wound the cutting with a cut on each side, about 1/2" to 1" long, just deep enough to remove a sliver of green bark. Dipping the cutting in a rooting hormone containing indolebutyric acid will aid rooting. The cutting has the end cut off just before dipping in rooting hormone containing a fungicide. Then the cuttings are placed in a flat of sterile media containing a mix of 50% milled sphagnum moss, and 50% horticultural perlite or vermiculite. The flat is placed in a polyethylene bag with struts to keep the bag away from the foliage and placed in a light area with no direct sunlight. The flat is rotated once or twice a week to compensate for variations in light and temperature. Using bottom warmth of 70-75°F will encourage root growth. Rooting usually takes about 6 weeks for evergreen azaleas and 3 to 4 months for large-leaf rhododendrons. Once the cuttings have rooted, pot or transplant them to flats containing a sterile mix of 60% milled sphagnum peat moss and 40% perlite. Fertilize once a month with an acid-based azalea plant food like Peters. Removing terminal buds promotes sturdy well-branched plants.
2) Deciduous azaleas are very tricky to propagate from cuttings. Take cuttings of deciduous azaleas when the new growth is soft and pliant. This is often coincident with time of bloom in early June. The ability to root decreases rapidly as new growth matures. Trim cuttings below a node (overall length of cuttings 3 to 5 inches) and dip in a rooting hormone containing fungicide. Insert in a medium of 60% milled sphagnum peat moss and 40% horticultural perlite. Usually bottom warmth of 75°F is used to encourage root growth. In late August, transplant cuttings that are rooted and grown on in the greenhouse with supplementary light (14-hours a day) to prevent dormancy and induce new growth. In the following fall, transfer to a cool, frost-free (35°F to 41°F) environment to induce dormancy. As new growth develops in the spring, transfer plants to a shaded environment. [After "Rhododendrons and Azaleas" by J. Lounsbery, Horticultural Research Institute of Ontario, Canada]
Layering is the easiest form of propagation for the home gardener. A lower branch is held down on soil (not mulch) with a stone. A slit is cut in an area in contact with the soil and the cut is treated with a rooting hormone. Then the cut area will sprout roots. When the roots are developed enough to support the end of the branch, usually in 2 years, the branch is cut from the parent plant and, if desired, transplanted.
Grafting takes a difficult to root cutting and grafts it onto an already rooted plant. It was the standard propagation technique prior to the 1950s and is still popular in Europe where acidic soil is not common and plants that are hard to grow can be grafted onto rootstocks of plants that are easy to grow like Cunningham's White. The big advantage of grafting is the use of disease resistant, soil tolerant rootstocks. Also, some hybrids don't produce good root systems, so if the plants are grafted onto a good rootstock, this is no longer a problem. There are two basic techniques of grafting, one involves grafting onto rooted rootstocks and the second involves grafting and rooting the rootstock at the same time.
The Conventional Side Graft
 |
 |
First, the conventional graft is show at the Rhododendron Park in Bremen, Germany.
The rootstock is rooted and grown for about 2 years before used in the graft. An elastic band is used to secure the graft.
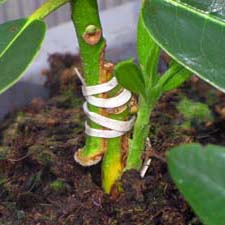
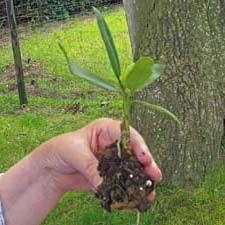
The Graft & Root Method
 |
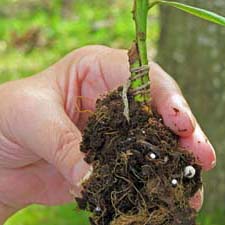 |
Second, the graft & root process shown after the rooting has completed at Timo Schröder's Nursery in Wiefelstede, Germany.
The cuttings for the rootstock and the scion are taken at the same time. The scion is side grafted to the rootstock cutting and secured with raw cotton string which rots naturally. The top is left on both cuttings. The rootstock is rooted immediately after the graft is secured. After the rootstock has rooted, its top is removed immediately above the graft. They don't care if the scion forms roots but they do not want the rootstock to form shoots. Any such shoots are removed.
There are many types of grafts and times of the year they can be done. One method used is in the spring just before growth starts, take a cutting which in grafting is called a scion and prepare it much as we mentioned in the section on cuttings, only this time cut the bottom end of the cutting into a long pointed "V" shape. Then take the plant you are using as rootstock and cut a slit about the length of the "V" you cut on the cutting. This slit can either be at the tip of the limb of the rootstock (top grafting) or into the side of the limb (side grafting), but it should be in wood where the bark is still green. Be sure to match the cambium layers (the green layer just under the bark) of the cutting and rootstock. Try to choose a cutting and an rootstock limb that are the same size so you can match the cambium layers on both sides, but if you can't, matching one side should work. In all cases remove suckers that come up from the rootstock.
Hold the scion in place using a rubber grafting strip, tape, or grafting twine. Seal the entire graft area with warm grafting wax or grafting paint. Remove the rubber or twine shortly after the union has healed. Never allow the binding material to girdle the stem. For more on grafting visit the North Carolina State University web page on Grafting.
Tissue culture or micro propagation is a very popular method of producing large numbers of rhododendrons for commercial use. Over simplified, it involves taking a piece of rhododendron wood and putting it into a test tube. Through the use of agars and auxins, absolute sanitation, proper temperature and lights, the piece of wood is induced to grow into multiple "seedling-like" growths with no roots. This tiny juvenile wood is then rooted. Needless to say this method is not for the general home gardener, though some "kitchen tissue culture" is being done. In some cases there seems to be some genetic damage or other variations in some tissue cultured plants and they don't all come out as clones of the original plant.
References
- BBC Gardeners' World Magazine (2019) How to layer rhododendrons
- Briggs, B.A., McCulloch, S.M. and Caton, L.A. (1994). In Vitro Propagation of RhododendronActa Hortic. 364, 21-26: ActaHortic.1994.364.1
- Bryant, Geoff (1996) Growing Rhododendrons and Azaleas
- Clarke, Jay Harold (1983) Getting Started With Rhododendrons and Azaleas.
- Hyatt, Don: Rooting Rhododendron Cuttings
- Hyatt, Don: Raising Rhododendrons from Seed
- Cox, Kenneth (2008) Plantsman's Guide to Rhododendrons, A,
- Greer, Harold E.(1996) Rhododendron Basics
- Reilley, H. Edward (2004) Success with Rhododendrons and Azaleas
- Spady, Herb (2012) Experience with Rhododendron Grafting: JARS V66N3